
Getting Started – Step by Step

Create a new product

Click new product on bottom menu → fill in all fields → click create product

How to create an audit

  1. Navigate to manage → create audit.
             
  2. Select a date from the drop down calendar menu. The date selected should be the last day of your audit period.

    For example, if you perform a stocktake on a Monday, on a weekly basis, your audit period would run from Tuesday to Monday and the date selected
    would correspond to that Monday.
    (Example: If you perform your stocktake on weekly basis, every Tuesday evening/Wednesday morning, your audit period will run from Wednesday start of business to the following week Tuesday close of business. The audit date selected will be the corresponding date for Tuesday (i.e. the last day of the audit period. So, if my audit date is the 25th of May, this will refer to an audit period starting on Wednesday, the 19th of May, adn ending on Tuesday, the 25th of May)
  3. Click create audit
  4. Repeat these steps for every audit period

Creating wastage types

    • Navigate to manage → site settings → wastage types
                             
    • Click add waste type → type in name → click add waste type

    Add Wastage

    Add New Wastage

    • To edit the wastage type, click edit → change the name → click save waste type
    • To delete the wastage type, click the bin icon → delete

Create a new product for a single site

  • Navigate to manage → products → new product
           
  • Type in product name, counting unit, select the department, add cost price

    (If you want to insert product straight into the location, click the tick box and select the location (optional step)
  • Click save and new if creating multiple products or save and close once all new product(s) have been entered
  • To edit a product (i.e. the name, counting unit or cost price), click the edit icon → make changes → click save
  • To delete a product, click the bin icon → delete

Importing Products

Navigate to Settings → import products (csv) → choose file (file must be in .csv format)
 

CSV File

  • Choose file (file must be in .csv format)

choose file

  • Click upload → click ok → ensure all column headings entered (i.e. product name, counting unit, department, cost price) → click import

upload file

click ok

  • Ensure all column headings entered (i.e. product name, counting unit, department, cost price) → click import

coloumn headings

  • Click import

click import

succesful

Users, Products, Site Settings

Logging In

  1. Simply log in to the DigiTally platform following this LINK
  2. Type in your username and password (emailed to you by our customer success team).

Manage Products

  1. Manage → products
  2. To create a new product, add product → fill in all fields → click ‘save & new’ if adding multiple new products or ‘save & close’ once all new products entered
  3. To delete a product, search for product → click bin icon → click delete
  4. To edit a product, search for product → change product name, department or cost price → click save

Single Site: Previous Audits

Home page → previous audits

  •  To edit previous audits, click audit date → select location to edit → find product by scrolling down list or using search bar function → update applicable fields (i.e department, unit cost or quantity) → click the save icon

Select Audit Date

  • Select location to edit → find product by scrolling down list or using search bar function → update applicable fields (i.e department, unit cost or quantity) → click the save icon

Select The Location

  • Update applicable fields (i.e department, unit cost or quantity) → click the save icon

Locate Product

Click Save

  • To delete a product counted in the wrong location, click bin icon → delete

Remove Product

Delete Record

  • To add a note, see guides for valuation by item report (19a) or audit trail report (19d)

Single Site: Display Products Not in a Location

  1. Navigate to manage → products → products in locations → show products with no department → edit icon → select department from drop down list → click save
  2. Repeat until all products have departments

Products Not in a Location

  • Navigate to manage → products
         
  • Select “products not in a location”

show products

  • Tip: follow steps for guide 6 (insert product into location) until all applicable products have been assigned to a location

Single Site: Set Targets

    • Manage → site settings → targets

  • Add or update target % → click save and close

Standard Users and User Permissions

  1. To add standard user and user permissions, click on store name → navigate to DigiTally icon → users → click add user → fill in all fields → click add user → tick permission boxes (if applicable)
  2. To delete user, click bin icon → delete
  3. To deny permissions for users, tick applicable boxes

Wastage

  • Go to main menu → wastage OR click wastage on bottom menu

wastage

wastage menu

1. Adding wastage

  • To add itemised wastage, search product → click on quantity column → add in quantity → click green tick → select wastage type → click ok → select waste user → click ok

wastage search

quantity

wastage confirm

  • Select wastage type → click ok → select waste user → click ok

select wastage type user

  • To add bulk wastage, click + icon → fill in cost value and comment → click next → select wastage type and waste user → click ok
    add bulk waste

    • To clear wastage entered, click the x icon → click clear (this will only clear recent wastage entered after most recent app sync)
      clear waste2. Results

      • To view all wastage entered, click result and select audit period
    waste results

Creating Locations

  1. Navigate to “quick add” → add location (location is the area where the count is performed. E.g. fridge, freezer)
    Quick Add
  2. Type in location name → click save and close
    Add Location
  3. To delete or edit a location, select manage → site settings → locations
    Delete or Edit
  4. To edit the location name, click edit → change the name → click save location
    Edit Location Name
    Location Name
  5. To delete the location, click the bin icon → delete
    Delete Location
    Delete Confirmation

Create Departments

Navigate

    • to quick add → add department (department is the category under which the product is classified)

  • Type in department name → click save and close
  • To delete or edit a department, manage → departments
  • To edit the department name, click edit → change the name → click save department
  • To delete the department, click the bin icon → delete

Add Departments

  1. Manage → store departments → add department → type in department name → click add department
  2. Option to exclude any departments from GP calculation
  3. To edit department, click the edit icon → edit name → click save department
  4. To delete department, click bin icon → delete

Add Suppliers

    • Manage → site settings → suppliers

  • Add supplier → fill in their name and any other applicable field → click add supplier

supplier master

add supplier

  •  To edit supplier details, click edit → edit the relevant field → click save supplier
  • To delete a supplier, click the bin icon → delete

Adding Cost Price to 0-Unit Products

Navigate

    • to manage → products → products in locations

  • Select “show products with 0 unit cost”

show products

  • Click the edit icon → type in cost price → click save

edit icon

save

  • Repeat until all new products have cost prices

Insert Product into Location

  • Navigate to locations table at the bottom right-hand side of the page
  • Click on the location name

Location Name

  • Click insert products

insert product

  • Select all applicable products and use the search function to find specific products → click insert
         
    Tip: if the product is greyed out on the list, it means that the product has already been inserted into that location
  • Repeat steps if wanting to insert products into multiple locations

How to Change User

  1. Go to main menu → click user → select user → enter password → click ok

Logging-In via App

  1. Open DigiTally app on android smartphone or tablet → enter username and password
App Log In

Update Password

Navigate

    1. to DigiTally icon → change password → enter current and new password

  1. Note: Password must have 9 characters, including at least one capital letter, small letter, number and special character

How To Add New Standard Users

  • Navigate to the DigiTally icon on the top right corner → click users
         
  • Click + icon users and plans

add user

  • Fill in all fields → click add user

add user

  • To edit user → click the edit icon next to user name → edit details, username, password or pin → click save
  • To delete user → click edit icon next to user name → click delete user → click delete

How to Add Waste Users and Edit Their Pins


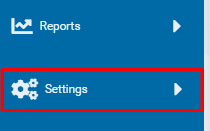
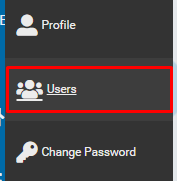
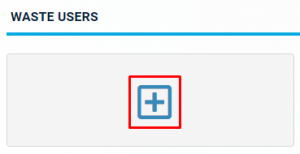
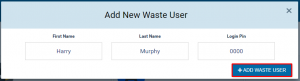
Navigate to the DigiTally icon on the top right corner → click users → click add button under waste users → fill in full name and pin → click add waste user
     

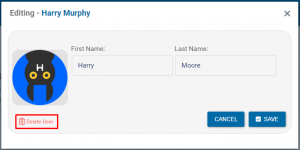
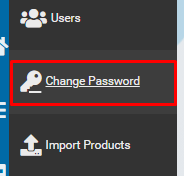
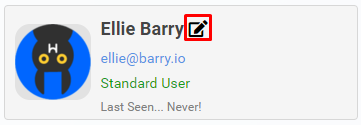
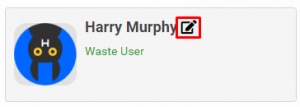
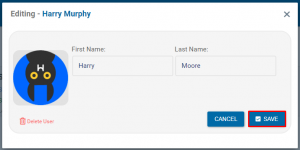
  • To edit waste user details, click on edit icon next to waste users name → edit details → click save
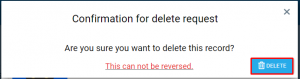
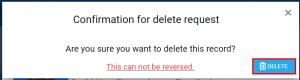
  • To delete waste user, click on edit icon → click delete user → click delete


How to Change Current Audit Stock Counts

Navigate

    • to locations table at bottom right hand side of the page

  • Click on the location name

Select The Location

  •  Find product by scrolling down list or using search bar function → update applicable fields (i.e department, unit cost or quantity) → click the save icon

Find Product

save

How to Edit Audit Dates (food+ and only person in charge of master)

  1. Login to master site → click store → manage → site settings → audit dates → edit → select new date → click save

Data Entry – Purchases, Sales, Labour, Waste

Purchases

  • Go to main menu → purchases

purchases

  • To add bulk purchases, click the + icon → fill in all fields → click ‘add next’ is adding multiple entries or ‘add’ if all entries complete

add bulk purchases

  • To add itemised purchases, click the receipt icon → fill in all fields → click ‘add next’ is adding multiple entries or ‘add’ if all entries complete

receipt icon

add next

  • To edit a purchase entry → click 3 vertical dots → click the edit icon → edit information → click save

vertical dots

edit icon

edit purchases


  • To delete a purchase entry → click 3 vertical dots → click the bin icon → click ok

delete purchase

confirm delete

Transfers

  • Go to main menu → transfers

transfers

  • Click the + icon → select transfer in or transfer out → fill in remaining fields → click ‘add next’ is adding multiple entries or ‘add’ if all entries complete

plus icon

add in out

add new transfer

  • For a transfer in: the product cost will reflect as a positive
  • For a transfer out: the product cost will reflect as a negative
  • To edit a transfer entry → click 3 vertical dots → click the edit icon → edit information → click save

edit transfer entry

edit transfer info

  • To delete a transfer entry → click 3 vertical dots → click the bin icon → click ok

delete transfer

confirm transfer delete

Single Site: Credits and Transfers

  • Manage → data entry → credits / transfers
  • Add credit/transfer → fill in all fields and select whether transaction is a transfer in / transfer out / credit

add credit tranfers

Transfer in out

  • For a transfer in: the product cost will reflect as a positive
  • For a transfer out: the product cost will reflect as a negative
  • For a credit: the product cost will reflect as a negative
credit

Single Site: Data Entry for Non-Itemised Entries

  • Quick add → data entry → select department (optional) → enter purchases, wastage, labour costs or salese
                 
  • If adding multiple figures per field (e.g. multiple sales amounts), click save and new. Once all figures added, click save and close.

Single Site: Itemised Purchases

  1. Manage → data entry → purchases → add itemized purchase → fill in all fields → click save and new to add more itemised purchases or save and close once all purchases entered
  2. To edit a purchase, click edit → edit the relevant field → click save
  3. To delete a purchase, click the bin icon → delete

Single Site: Itemised Sales

  • Manage → data entry → sales → add sale
       
  • Select department (optional) and net sale figure → Click “Add sale”
  • To edit a sale, click edit → edit the value → click save
  • To delete a sale, click the bin icon → delete

Single Site: Itemised Wastage

  • Manage → data entry → wastage
         
  • Add itemised wastage → fill in all fields → click save and new to add more itemised wastage or save and close once all wastage entered

Add Itemised Wastage

Add New Wastage

  •  To edit a wastage entry, click edit → edit the relevant field → click save
  • To delete a wastage entry, click the bin icon → delete

Single Site: Labour Costs

  • Manage → data entry → labour costs

    • Add labour cost → fill in all fields → click add labour cost

    labour cost

    add labour cost

    • To edit a labour cost, click edit → edit the relevant field → click save
    • To delete a labour cost, click the bin icon → delete

Count, Sync, Recheck

Counts

  • 1. Go to main menu → count OR click count on bottom menu

    count app

    count menu

    A. Insert product into location with existing products

      • Select location from the drop down → click the 3 horizontal dots → click insert into location → select all applicable products or use search bar to find products → click insert items
      • Note: products are grayed out if they are already in that location

    select location dots

    insert location

    insert items

    B. Remove products from location

    • Select location from the drop down → click the 3 horizontal dots → click remove from location
    • Note: you are only removing the product from the location, not your product file

    select location dots

    insert location

    C. How to search for product in location

    • Select location from the drop down → click search icon → type key letters or words

    search icon

    type key letter

    D. Add locations

    • Click on the location drop-down menu → click add location → type in name → click add

    drop down

    add location

    click add

    E. How to count → addition, whole numbers, multiplication and decimals

    • Select location from the drop down → click on 0.0 in units column → add count → click green tick button
    • Calculator can be used to type counted number directly, for multiplication and addition

    Tip: arrange products in the order they are counted to save time. To do this, press and hold product → shift up or down into order

    location from drop down

    add count

    green tick

How to Sync

  1. Ensure device is connected to wifi → click easy sync → wait for green tick to display

Easy Sync

2. Sync before and after entering data

Easy Sync Complete

How to Logout

  • Go to main menu → click logout → click logout (ensure all data has been synced)

logout

unsaved changes

Single Site: How to Spot Count Inconsistencies

  1. Navigate to manage → products → products in locations → look at ‘quantity difference’ column
       
  2. Look at ‘quantity difference’ column
quantity difference

How to View and Add Notes for Audit Period

  • Home page → previous audits → click post-it note icon

post note icon

  • Note: if the post-it icon is blue, it means a note has been created for that audit period. If the icon is grey, no note has been created
  • To add a note, see guides for valuation by item report (19a) or audit trail report (19d)
note

Reporting – Explain My GP

Single Site: Audit Analysis

  • Audit analysis → look at status for each rule → click edit icon to resolve
     
  • Select ‘no action needed’ or ‘resolved’ → type comment → click save

Resolve Issue

Selct Option

Edit Product Dept

  • To view completed actions, click dots icon in actions column (if there is no icon, no action has been completed)

3 dots

Department Actions

  • Note: there are 5 standard rules but to create own rules, click rules

Rules

  • Select option from each of the 3 drop down menus → click add alert
Rules for Analysis

Explain my GP Feature

  • Navigate to ‘Explain my GP’ on right-hand corner
  • View how GP is calculated, why GP result has increased/decreased, and a comparison between previous and current audit
GP Explained

Graphs

  • Select date range to view date specific graphs

filter

home filters

  • Filter graph by selecting relevant tick boxes

filter graph

  • Download graph to SVG, PNG or CSV
graph

Single Site: Reports

  • Valuation by item

  1. An itemised report per product: unit cost; previous quantity, current quantity, quantity difference, previous cost, current cost, cost difference
         
  2. To add note to report, type note → click save notes

save notes

3. To delete a supplier, click the bin icon → delete

  • Valuation by department

  1. Itemised report per department: previous quantity, current quantity, quantity difference, previous cost, current cost, cost difference, percentage of product distribution
         

    Audit Date VBD

    • Valuation by location

    1. Itemised report per location: previous quantity, current quantity, quantity difference, previous cost, current cost, cost difference, percentage of product distribution
         

      Audit Date VBL

      •  Audit Trail

      1. Itemised report of all counted products per location: total quantity and total cost with a user, date and time stamp
             Audit Trail
      2. To add note to report, type note → click save notes

      Save Note

      • Wastage report and how to use filter option

      1. Itemised report of all wastage: wastage type, unit cost, current wastage quantity, current wastage cost with a waste user and date stamp
             
      2. Report can also be downloaded as csv file
      Audit Report